Tag Smarter, Not More: How to Design a Shopify Tag System Before You Automate It (with Taggify)

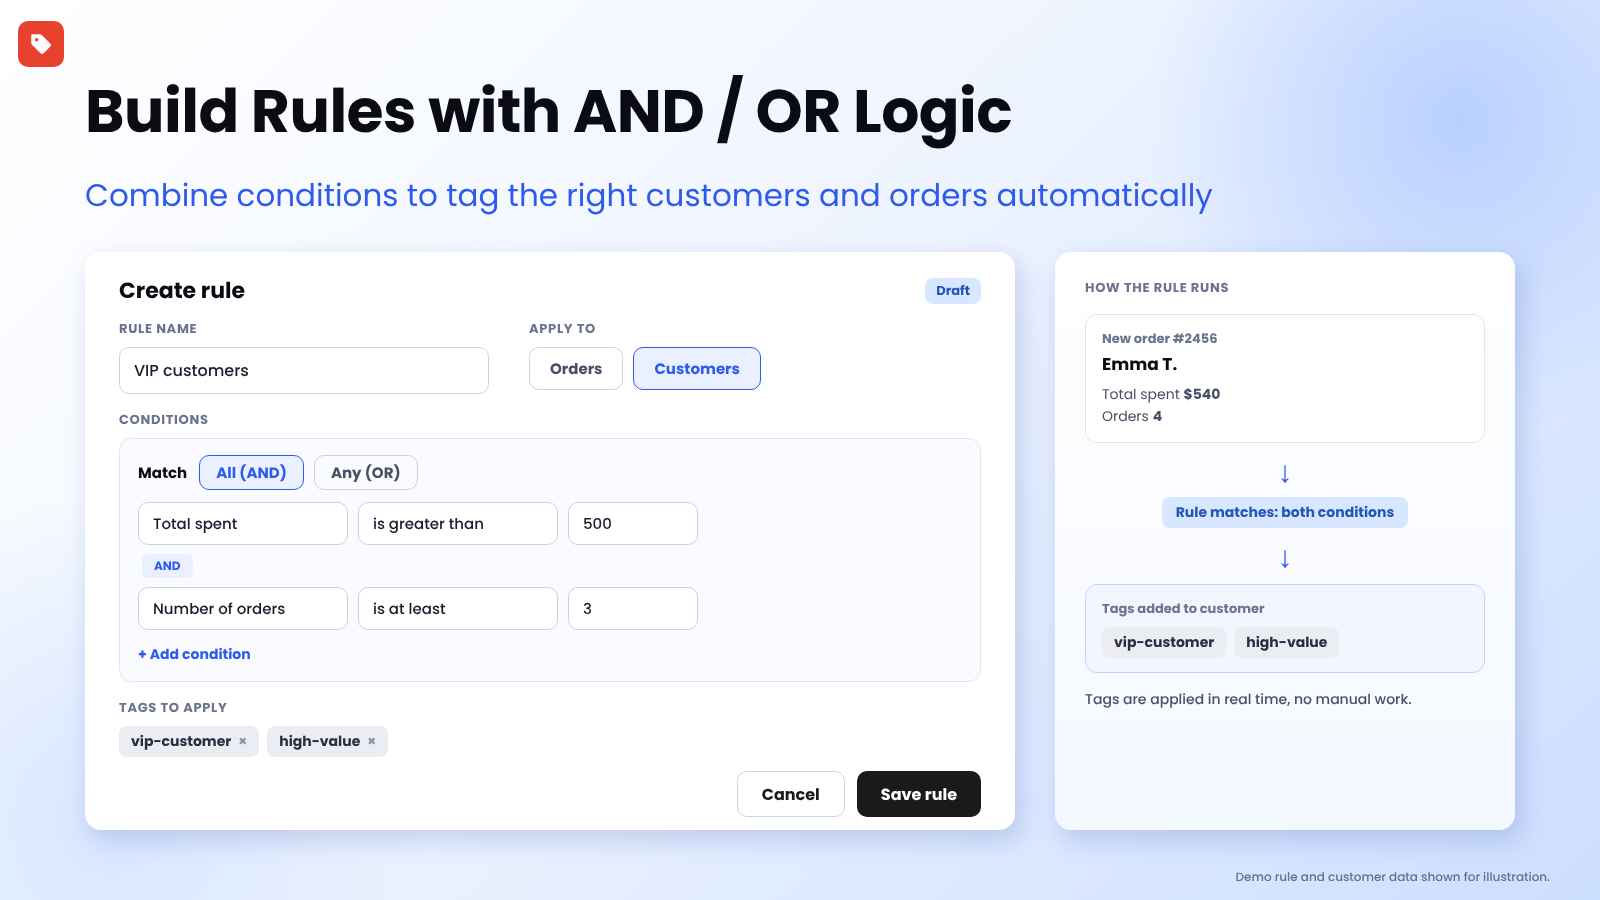
Demo rule and customer data shown for illustration.
👉 Automate your tags the organised way: Install Taggify ‑ Customer & Orders on the Shopify App Store →
Automation Makes a Good System Better, and a Messy One Worse
Most merchants meet tagging the same way. They create a few tags by hand, find it useful, and then look for an app to automate it. The automation works, and six months later the store has 80 tags, three spellings of "VIP", and nobody remembers what promo2 was for.
Tags are only valuable when they are consistent. They power customer segments, email targeting, wholesale handling and fulfilment workflows, and all of those break quietly when the tags underneath are a mess.
This guide is about the part that comes before the rules: how to design a tag system you won't regret, and then how to set it up in Taggify so it runs in the background. If you want ready-made rule ideas to copy, see our 10 customer tagging rules. If you are comparing against Shopify Flow, see Shopify Flow vs. Taggify.
Step 1: Decide What Your Tags Are For
Before you create a single tag, write down the actions you want tags to drive. Most stores need only a handful:
- Segments: groups you market to, such as VIP customers or repeat buyers
- Wholesale handling: recognising trade buyers so they are treated differently
- Fulfilment and operations: flagging orders for gift wrap, special packing or review
- Support and risk: marking customers or orders that need attention
If a tag doesn't change what you or your team do, it doesn't need to exist. This one rule prevents most tag sprawl.
Step 2: Use a Naming Convention
A simple convention makes tags readable at a glance and easy to filter. Here is one pattern many stores find workable. Adapt it to your catalogue.
| Purpose | Suggested prefix | Example tags |
|---|---|---|
| Customer segments | seg- | seg-vip, seg-repeat-buyer |
| Wholesale and trade | ws- | ws-approved, ws-high-volume |
| Operations | ops- | ops-gift-order, ops-review |
| Campaigns | camp- | camp-black-friday-2026 |
A few habits keep the system clean:
- Lowercase with hyphens. Mixed capitals and spaces create near-duplicates.
- One meaning per tag.
vipshould not also mean "wholesale". - Date only campaign tags. Evergreen tags shouldn't carry a date.
- Keep a short tag dictionary. A shared document listing each tag and what it's for is worth more than any tool.
Step 3: Write Each Rule in Plain English First
Taggify automatically tags customers and orders, new and existing, using rules. Each rule combines conditions with AND/OR logic, so write it as a sentence before you open the app:
When a customer has spent more than $500 AND placed at least 3 orders, add
seg-vip.
A few guidelines for the logic:
- Use AND for precision. Every condition must be true, which keeps the tag meaningful.
- Use OR for coverage. Any condition can be true, which is useful for catching several routes into the same group.
- Start narrow. It's easier to widen a rule later than to clean up tags that were applied too broadly.
The rule builder shown at the top of this post is the idea in practice: choose what the rule applies to, set your conditions, add the tags, and save. Once a rule is active, tags are applied in real time as new orders and customers come in.
Step 4: Add Exceptions From Day One
Every tagging system has edge cases. Staff accounts that place test orders. Wholesale customers who also buy at retail. A customer you never want auto-tagged.
Taggify lets you set exceptions to control and prevent unwanted tagging. Build them in when you create the rule, not after you've noticed a problem.
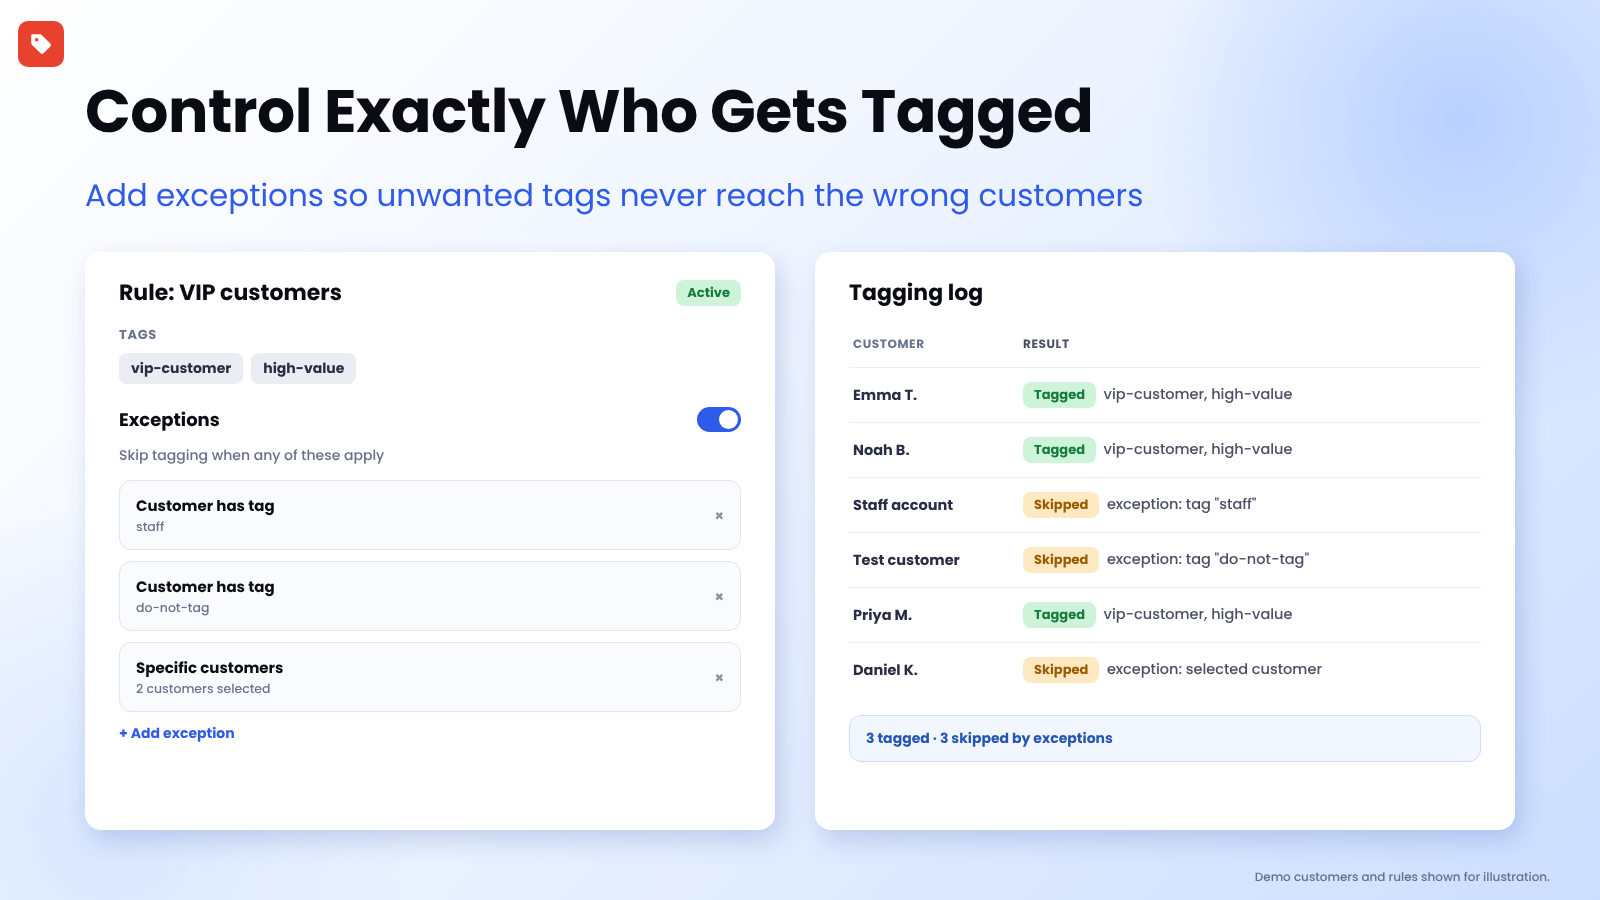
Demo customers and rules shown for illustration. Exception options and log layout are illustrative.
Good first exceptions to consider:
- Staff and test accounts
- Customers you've already manually classified
- Any group that would receive conflicting tags from another rule
Step 5: Backfill Your History on Purpose
A tagging system that only sees new orders takes months to become useful. Taggify can bulk tag past orders and customers, with activity tracking, so your historic data is segmented too.
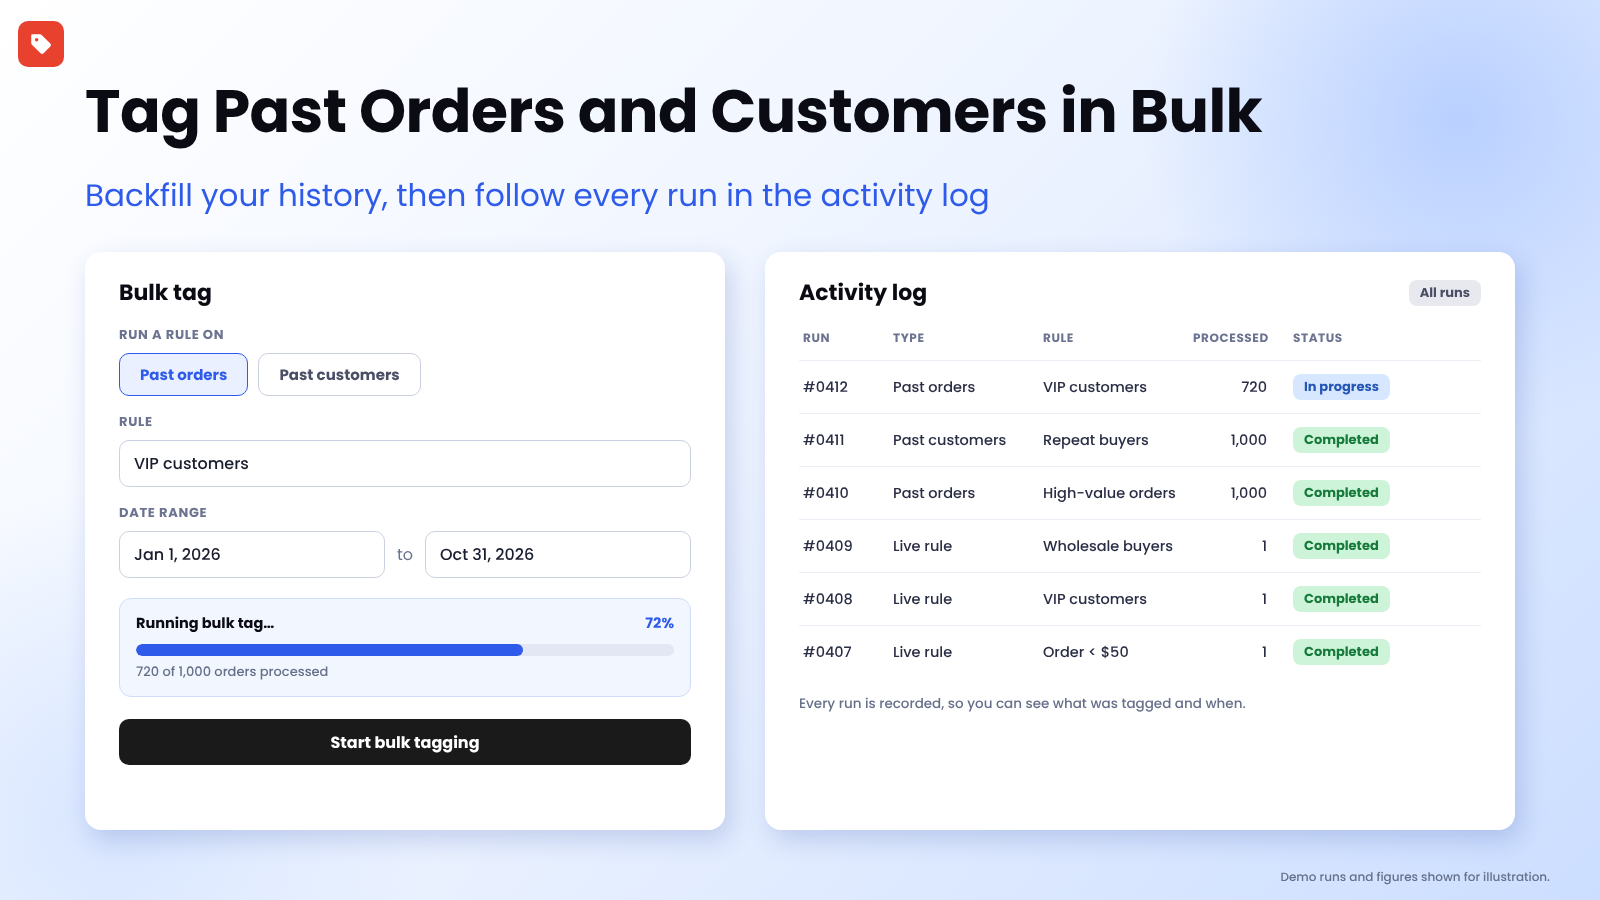
Demo runs and figures shown for illustration.
A sensible order of operations:
- Run the rule on new activity first and confirm the right records are being tagged.
- Check a few tagged customers and orders in your Shopify admin.
- Then backfill history using bulk tagging.
- Review the activity log to confirm what ran and what was tagged.
The current listing shows every plan includes a past-orders process of 1,000, and Enterprise adds bulk tagging for up to 10,000 past customers.
Step 6: Audit Your Tags Once a Month
Ten minutes a month keeps a tag system healthy:
- Review the activity log for anything unexpected.
- Check tag counts in your Shopify admin. A tag applied to almost nobody, or almost everybody, isn't doing its job.
- Retire tags nobody uses, and merge near-duplicates.
- Update your tag dictionary.
Step 7: Understand What You Pay For
Taggify's plans are measured in processes. In our own explanation, a process is one resource, such as a new order or an updated customer, evaluated against your rules. It is not one tag written, so a single event that matches several rules is still one process.
| Plan | Price | Processes included | Extra processes |
|---|---|---|---|
| Free | $0 | 100 | $0.05 each |
| Basic | $5.99/month | 200 | $0.04 each |
| Professional | $9.99/month | 1,000 | $0.03 each |
| Enterprise | $19.99/month | Unlimited | None |
All plans include a past-orders process of 1,000. Enterprise also includes dynamic tagging and bulk tagging for up to 10,000 past customers. Charges are billed in USD every 30 days, and pricing can change, so check the listing for the latest details.
A practical way to choose: count how many orders and customer updates your store sees in a month, then pick the plan whose included processes cover it.
A 30-Minute Setup Checklist
- List the three to five actions your tags should drive.
- Write your naming convention and a short tag dictionary.
- Write your first two rules in plain English.
- Build them in Taggify with AND/OR conditions.
- Add exceptions for staff, test accounts and special cases.
- Watch new orders for a few days, then bulk tag your history.
- Put a monthly audit in your calendar.
What Merchants Say
Taggify currently shows a 4.7 rating from 12 reviews on the Shopify App Store, with 10 of them five stars. Here's what a few reviewers said, paraphrased from the listing:
- A merchant in Ireland, using the app for about six months, said it saved a lot of time and made printing and packing simpler, and praised fast support (January 2025).
- A merchant in the United States, using it for about three years, called it great for order processing and said support replies within a day (October 2024).
- A merchant in Switzerland reported some early problems that support fixed quickly (January 2024).
Frequently Asked Questions
What can Taggify tag? Customers and orders, both new and existing.
Can I use AND and OR conditions together? Yes. You can create advanced rules with AND/OR conditions and flexible logic.
Can I tag orders and customers I already have? Yes. You can bulk tag past orders and customers, with activity tracking.
How do I stop certain customers from being tagged? Set exceptions on the rule to control and prevent unwanted tagging.
Is there a free plan? Yes. The Free plan includes 100 processes and the 1,000 past-orders process.
Does Taggify work with my Shopify plan? The listing shows it works with the Shopify admin. Check the listing for details about your store.
Final Thoughts
Good tagging is a design problem before it is an automation problem. Decide what tags are for, name them consistently, write rules in plain English, add exceptions early, backfill deliberately and audit monthly. Then let Taggify do the repetitive work in the background.
✨ Ready to organise your customers and orders? Try Taggify today.
💡 Need help? Our support team is here for you 24/7 - support@appifycommerce.com